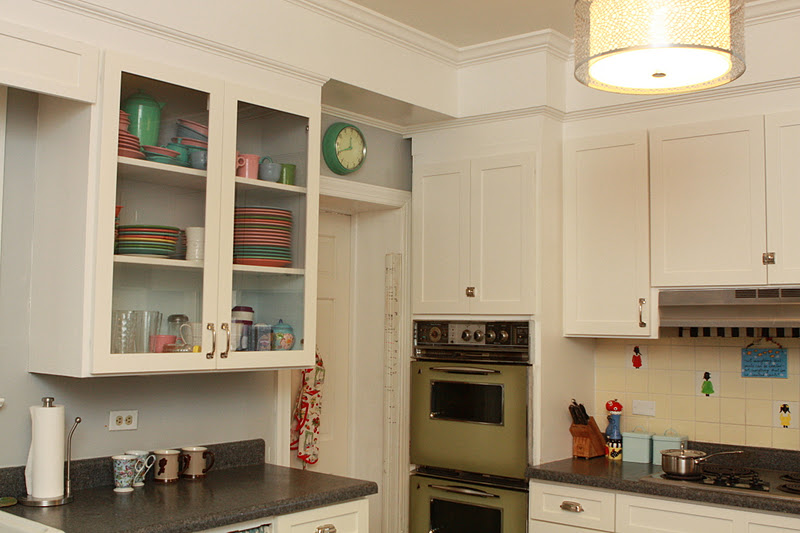
photo shoot of my home. The kitchen is still awaiting new countertops and appliances…it is what it is…and I plan to do subway tile backsplash when I get the new countertops…
but the area behind the stove needed something…anything!
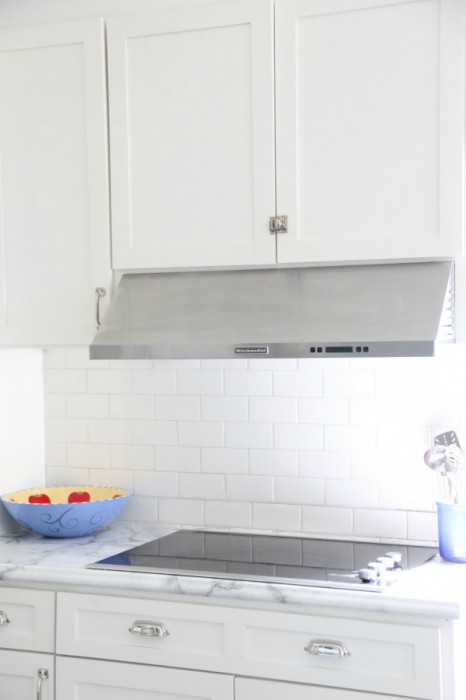
I decided to do a quick and easy
SUBWAY TILE BACKSPLASH
behind the stove…
DILEMMA- I knew if I ripped the old tile out…I risked creating a bigger job than I had time to tackle…
so I did some sleuthing and found out that YES, YES, if the proper steps were taken…I could put the NEW tile, right over the OLD!!!
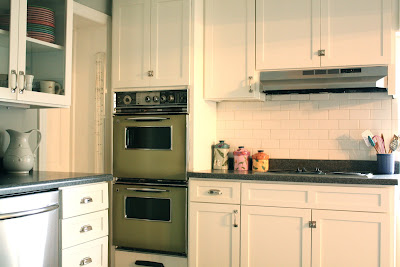
to freshen the look… and to HIDE the
current 40 year old tile…OLD TILE
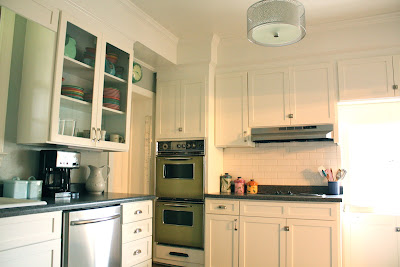
and
NEW TILE
WHAT A TRANSFORMATION!!!
..after trying white grout (too WHITE) and then dark gray (too DARK)
I settled on
a pale tan grout.
I cannot wait to do the whole room!!!
just think..with new countertops, new cooktop and double oven, floor and range hood…
….it will be amazing!
TUB at Home Depot with all my supplies in it, and then added a tile sander (looks like a big nail file)
Here are my VERY BASIC Instructions:
1.Prep area by washing surface, cleaning thoroughly (use a strong DE GREASING SOAP) and then sanding lightly (steel wool is easiest to work with)
to make the surface less slippery.
2. Begin your pattern from one corner, (I did not use spacers) working across, checking with your level.
3.Apply the adhesive to the wall with the trowel..making little grooves, so it can dry.
4. I did not have an electric tile cutter (which can be rented and I HIGHLY recommend if you do a big job) BUT only had to cut 3 tiles – in half for 6 end pieces. I scored them with a mat knive, then used the
nipper, and then used the sander with the tile in water, to smooth the edges.
5. I let the tile set for about 8 hours, then I applied the grout. (NON SANDED for walls…SANDED for floors) I got a tad excited and I used a tan colored sanded one, by mistake but I actually like the look. Apparently the rule is – thin space between tiles – no sand and floor or deep groove – SANDed because the sand prevents the grout from sinking down. makes sense.
I did this whole thing in ONE HOUR!
…have you ever put tile over tile?
XO
addendum…
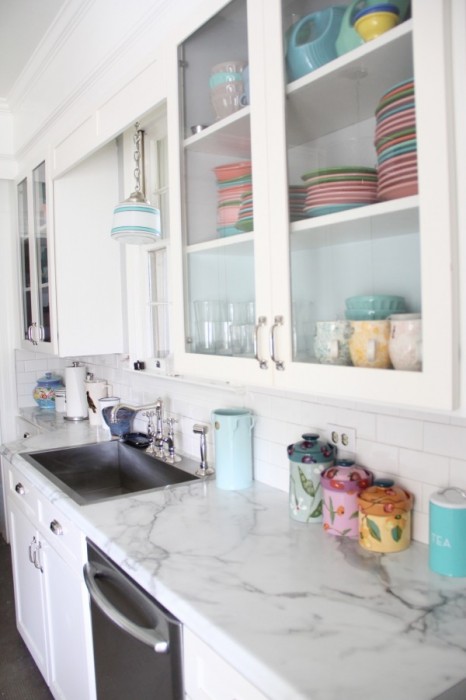
The kitchen is finished! see the completed Renovation HERE!!!
It’s a pretty good idea that you installed the new tiles over the old tiles! This would make your job easier and faster. Plus, it can make the foundation of your backsplash much sturdier. I love the subway tiles; it made the kitchen look like new again. Great work!
[…] 6. YES YOU CAN, TILE OVER TILE […]
[…] Should I paint it? Put up new tile over the old tile? Or do it right, demo it and put up something brand new? Or leave it […]
Hi Leslie… We were crashed by John and Sherry too. 🙂 I’ve been itching to make over our dark kitchen and plan to paint the cabinets soon and change out the backsplash. I want to just lay it over the old as well. Partially because I’m lazy and ripping it out sounds major. Just wondering if you have any ideas for disguising the edges. Thanks… Becky
how do you tile the bulldog edges
I belive I just went over them with other bulldog tiles? would need to take a look.
How did you tile around the electrical outlet?
The outlet was non operable and disconnected so we tiles right over it!
Gorgeous!! I want to know tho what kind of counter top is that…..marble, granite, quartz??? It is gorgeous!!!
Hello,I check your blog named “YES…you CAN… TILE OVER TILE | My Old Country House” daily.Your writing style is awesome, keep up the good work! And you can look our website about proxy list.
Did the tiles ever fall down? Did they last for years? I’m about to do this myself.


Nicely designed. keep it up.
Bathroom Remodeling Arlington VA
Amazing!
I would have never thought to do that. 🙂
brilliant!!!! and it looks fantastic!
It’s a pretty good idea that you installed the new tiles over the old tiles! This would make your job easier and faster. Plus, it can make the foundation of your backsplash much sturdier. I love the subway tiles; it made the kitchen look like new again. Great work!
[…] 6. YES YOU CAN, TILE OVER TILE […]
[…] Should I paint it? Put up new tile over the old tile? Or do it right, demo it and put up something brand new? Or leave it […]
Hi Leslie… We were crashed by John and Sherry too. 🙂 I’ve been itching to make over our dark kitchen and plan to paint the cabinets soon and change out the backsplash. I want to just lay it over the old as well. Partially because I’m lazy and ripping it out sounds major. Just wondering if you have any ideas for disguising the edges. Thanks… Becky
how do you tile the bulldog edges
I belive I just went over them with other bulldog tiles? would need to take a look.
How did you tile around the electrical outlet?
The outlet was non operable and disconnected so we tiles right over it!
Gorgeous!! I want to know tho what kind of counter top is that…..marble, granite, quartz??? It is gorgeous!!!
Thank you!!!
Okay are you sitting down? The countertops are FORMICA!!!! Read all about them here!http://myoldcountryhouse.com/monday-makeover-part-one-the-budget-kitchen/
They look that good in person too!
Hello,I check your blog named “YES…you CAN… TILE OVER TILE | My Old Country House” daily.Your writing style is awesome, keep up the good work! And you can look our website about proxy list.
Did the tiles ever fall down? Did they last for years? I’m about to do this myself.
NOPE – STILL THERE!