Much to my chagrin….
Keeping my home organized is NOT a One Shot deal.
It’s not even a twenty shot deal!
It is an ongoing process.
Its a way of life.
There is maintenance involved.
As our family grows, the seasons change, so do our various needs change, including the ways we keep ourselves organized-
change! change! change!.
Therefore, I am always open to any New, Creative, Cute, Hip, Fun, Eclectic ways
to keep My life, My mind AND My house organized.
A few years ago, when the kids began saving their own little odds and ends: Birthday cards, tickets to a favorite movie, and especially photos of their friends, pets, relatives and celebrities….
I made them some message boards for their bedrooms.
Then of course, because I am ME, I went on to
make and sell over 200 of these
fabric and ribbon message boards
…in all different fabrics.
they were a huge hit.
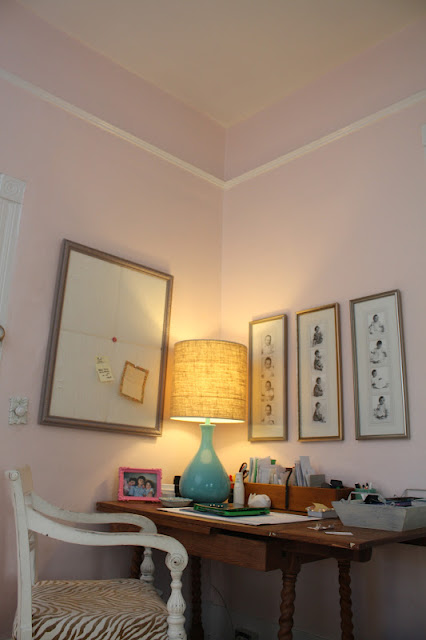
So, fast forward to NOW, and I was setting up my new desk…and I needed someplace to stash photos and business cards
and keep track of appointments…
someplace, a NON electronic place….
where things would not get buried and appointments would not get forgotten…
I thought of making a message board.
But because my desk is now in the Living Room,
I knew I had to take it up a notch.
BE A LITTLE FANCIER!
I wanted to use a more upscale fabric, maybe a Belgian linen or a pretty upholstery print and I wanted this message board to have a frame.
hmmm.
Time to Re-use and Re-cycle!
UPSCALE MESSAGE BOARD!
Tutorial
1.I took an old framed print, took the glass out and put it someplace safe.
Then I took the Dry-mounted, matted print out.
2. At HOME DEPOT I bought a sample size of
Martha Stewart’s CAVERN in flat finish.
Martha Stewart’s CAVERN in flat finish.
3. I painted the frame and then sanded it to expose some of the gold underneath.
5. On a drop cloth I lay the fabric down, right side facing down.
6. Then I lay a piece of quilt batting, cut to the same size as the fabric.
7. Next, lay the print which is matted and then mounted on a piece of foam core face UP on top of the batting and the fabric- The FOAM CORE is like the kind I used in the cornices HERE, (obviously, you could JUST use the foam core alone-but I found the staples stayed
in the mat better than the foam core alone).
in the mat better than the foam core alone).
8. I stapled the fabric and batting down, alternating side to side
and pulling the fabric to keep in tight. I put two pieces of 1/2″ grosgrain ribbon
in a criss-cross on the front.
9. After the fabric was stapled down, and the corners finished, and the fabric covered board inserted into the frame….to keep everything in place..I lay a scrap piece of fabric over the back and stapled it down around the edges.
10. Once the back was secured I put D-ring hook and a wire across the back to hang it.
11. Sitting on my desk was this pin, displaying my MANTRA,
“KEEP CALM AND CARRY ON”
which I prompting stuck in the center of the ribbon to secure it in place, I LOVE spontaneous solutions!!!
12. When I went to go get a hammer and nail to hang my new message board…Charlie interrupted my work to give me a surprise gift…a dried frog…
so thoughtful…
13. Back on track..I installed the message board right next to my desk!!!
The foam core board, which is what the print was dry mounted upon,
is perfect for inserting push pins!
oooh oooh…..My NEW ipad2 cover….I LOVE LOVE LOVE it,
a treat (from myself TO myself) from Kate Spade…
It is NAVY oilcloth with Little green hedgehogs.
TOO cute. Seriously I love this like a new toy!!!
and look at the inside!
I cannot wait to fill my message board up with photos and memories and messages!
Thanks for visiting My Old Country House!


looks great, lesli! and the dried frog photo was HILARIOUS
Like your new message board! Very creative!
Dee Dee
Hey those rugs are fabulous. Where did you get them? Love the message board btw.
The Rugs are from Dash and Albert…the Gypsy Rose Rug I think and they are indestructible!!!Try Layla Grayce.com xoxoxox