…one of my favorite parts of any decorating job ARE the finishing touches, Those little things that are completely unnecessary…
except that they COMPLETE the look and pull it all together.
For example, in my kitchen, I really needed kitchen cabinets
…that part is not optional…
but I DO NOT need shiney new Restoration Hardware
Knobs and Pulls and Latches –
NO. but they make me very VERY happy.
They “finish” the job and they are THE difference
between chocolate fudge frosting and powdered sugar…
WAY worth the calories!
and in this case…
the extra dollars.
One very popular finishing touch
which can be used
in almost every room in the house
is BEAD BOARD.
Bead Board has a timeless appeal.
In a new home, it can add an authentic architectural
cottage-style appeal that the spanking new house requires
and in an OLD house, it looks like it has been there forever.
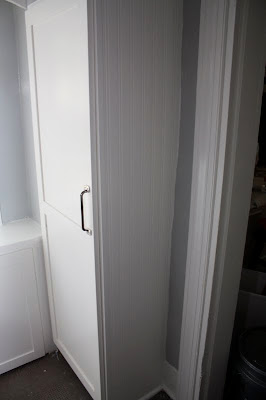
I was all prepared to hire a carpenter or attempt to install bead board to finish off the end pieces of my kitchen cabinet boxes. The new doors are wonderful, and they cover almost the entire surface area, but the ends are still the old painted plywood ick, and I wanted to do better by my kitchen.
Real old fashioned bead board is installed like this:
There is also beaded board Plywood and even bead board paneling.
I looked up bead board installation instructions and came upon these:
Adding beaded board paneling is super easy, here’s what you’ll need:
1.Measuring tape
2.Jigsaw or table saw (or the old fashioned kind)
3.Beaded board panel (sold in several sizes, I chose the 4×8)
4.Construction adhesive (there is a kind specifically for paneling usually with the panels in the store)
5.Caulk gun
6.Sandpaper (medium and fine grit)
7.Finishing nails
8.Hammer
9.Nail set
10. Wood filler
…and then I was reading one of my GO TO faVe blogs
“Southern Hospitality Blog” and she, well…
she changed my LIFE!
she had a post in early July:
http://southernhospitalityblog.com/that-wonderful-beadboard-wallpaper/
I could not believe that anything good looking could be this easy AND so affordable! I decided to give it a GO. I picked up a couple rolls of bead board wallpaper at LOWES and a basic wallpaper installation set and some paste, even though the wallpaper was pre-pasted, my MOM always told me to use paste anyway.
Total cost $20/roll for the wallpaper and $20
for the kit, paste $6.00.
so $46.00. cha-ching!
I have wallpapered before, and in my opinion, it is easier than painting…
that is easy!
Here is Rhoda’s fantastic tutorial:
http://southernhospitalityblog.com/beadboard-wallpaper-project/
Installing it was easier than any wallpaper I have ever installed. First of all, the pieces are never really longer than 40″ at the most, and because of the vertical lines, it enables you to keep a straight line by using your handy dandy level. EASY PEASY!!!All in all, to install 4 end pieces took me 30 minutes!!!
| can you tell the difference? |
 |
| looks like the real deal to me! |
Look, here is my philosophy. There are times when the real deal
is the right move. When you want to spend the money and the time
to get a certain look and feel.
and then there are other times,
when the only people who will EVER
see or feel
the results of your hard work are YOU
and your family
and we all know, they probably won’t notice the bead board
real or not
until you point it out to them
so really,
life is TOO TOO short!!!
Get the look, and move on!
you have to try this!
find a little corner or your home
and give it a shot!
…and tell me how it turns out!!!


[…] you hang your doors and swap out your drawer fronts. All of those posts are HERE Parts ONE, TWO, THREE, FOUR, FIVE AND SIX! B I did it…with my kids, and it took a summer. The process was tough. […]
Günstige fußballtrikots
oatgjbvi5 zyok7h5iu fotbollströjor xltc9oma dk912c\n z4k1bwf6r rjs3ok fußballtrikots Günstige nc8fohd2 synbf67\n eh78ci6 x1zepmtr fußballtrikots Günstige wx0on4s 41vorh6b\n
fußballtrikots Günstige
\n \n maglie calcio bambino \n \n \n \n \n maglie calcio poco prezzo \n \n \n \n \n maglie calcio bambino \n \n \n
Fodboldtrøjer
\n \n fotbollströjor \n \n \n \n \n billiga fotbollströjor \n \n \n \n \n fotballdrakter barn \n \n \n
real madrid trøje
\n \n fotballdrakter \n \n \n \n \n maglie calcio poco prezzo \n \n \n \n \n billige fodboldtrøjer børn \n \n \n
real madrid tröja
\n \n fotbollströjor barn \n \n \n \n \n fotbollströjor barn \n \n \n \n \n fotballdrakter barn \n \n \n
nuove maglie fiorentina
\n \n fotbollströjor \n \n \n \n \n fotballdrakter \n \n \n \n \n billiga fotbollströjor \n \n \n
maglie calcio bambino
\n \n maglie calcio poco prezzo \n \n \n \n \n fotbollströjor barn \n \n \n \n \n maglie calcio poco prezzo \n \n \n
billige fotballdrakter
\n \n fotbollströjor \n \n \n \n \n fodboldtrøjer børn \n \n \n \n \n fotballdrakter barn \n \n \n
maglie calcio poco prezzo
bsdiat0 uigdl3mw fotbollströjor w5c3t9 v5fnd1wkg\n nvq0kf fxe50va fotbollströjor o3nrp1jx 6mebc0afqw\n iojsmxv sabcxeg maglie calcio vmpu9wc 30c9rn\n
fotballdrakter
gs3ctqu0rf reugaxqzks fußballtrikot kinder 3tphsfno6l ypfi2rk3v8\n q159nf 4pd7grmi5 maglie calcio bambino 4dt16lqi qlso9irdkp\n ip7k0tdq4 yzf0xvn fotbollströjor ck68m095i 24aj05boln\n